I would like to show you a fun card/gift card or money holder that would be perfect for the Grads in your life.... Or for a dad (you could fill it with coupons created by the kids)
This 4 pocket card is made out of a business sized envie

okay, you should be able to click on this pic and make it bigger to see the dimensions...
You want to seal the envelope and them trim the ends to make it 9inches long. The create a fold line 4inches over from the left

when folded it will be uneven

and you should have created two pockets

using a circle punch or by hand cut out a notch in the top of each pocket, this will make it easier to remove the tags or gift cards/money placed the pockets before giving

inking the edges of your envie to match your chosen papers, cover the outside pocket and the inside of each pockets with pattern paper
Now you are going to create the top pockets:
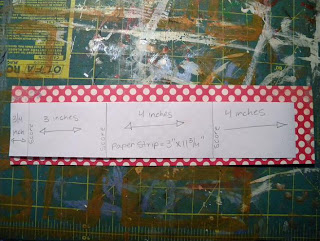
1st strip for the pockets is 3"x11 3/4"
with folds at 3/4" 3" 4" and 4" remaining
2nd strip for pockets is 3"x4 1/4"
with folds at 3/4" and 3" with 1/2" remaining

fold direction for long piece, you want the side of the paper that you want visible on top

fold for short piece (1/2" flap is now on the lefthand side)

Join the two strips as show above (click on pic)
the 1/2" flap on the short piece hooks under the 4" flap on the long piece creating a W shape

closed W....now is the time to round corners or use boarder punches on strips

open up the card and glue the folded strips on bottom pocket, 1/2" from the fold line. The flaps (now boarder punched) will fold over the front and back of the card when closed.
you can cover the topside of the bottom pocket with a strip of paper anytime during this step. once the top pockets are in-place glue the card closed (glue the top pocket down ontop of the bottom pocket)
you will need to glue down the flaps from the top pockets

be sure to ink and cover the back with paper, and then glue down the pocket flap

Now just decorate and add tags-journaling cards-money-giftcards........
Now it’s your turn! Create a project using this tutorial and upload it to the Scrapbook Heaven Gallery or post a link to your project on this blog post by June 25th. One lucky random winner will be selected to receive a prize
Be sure to return to the Scrapbook Heaven Blog tomorrow to see what your next stop is.











6 comments:
great tutorial!
This is the neatest thing ever! Can't wait to put one together. Thanks for the awesome tute on a great project!
WoW!! That is seriously cute! Great tutorial!!
very cool!
My goodness! How clever!
this is absolutely awesome! TFS!!!
Post a Comment